What Is a WhatsApp Workflow Builder?
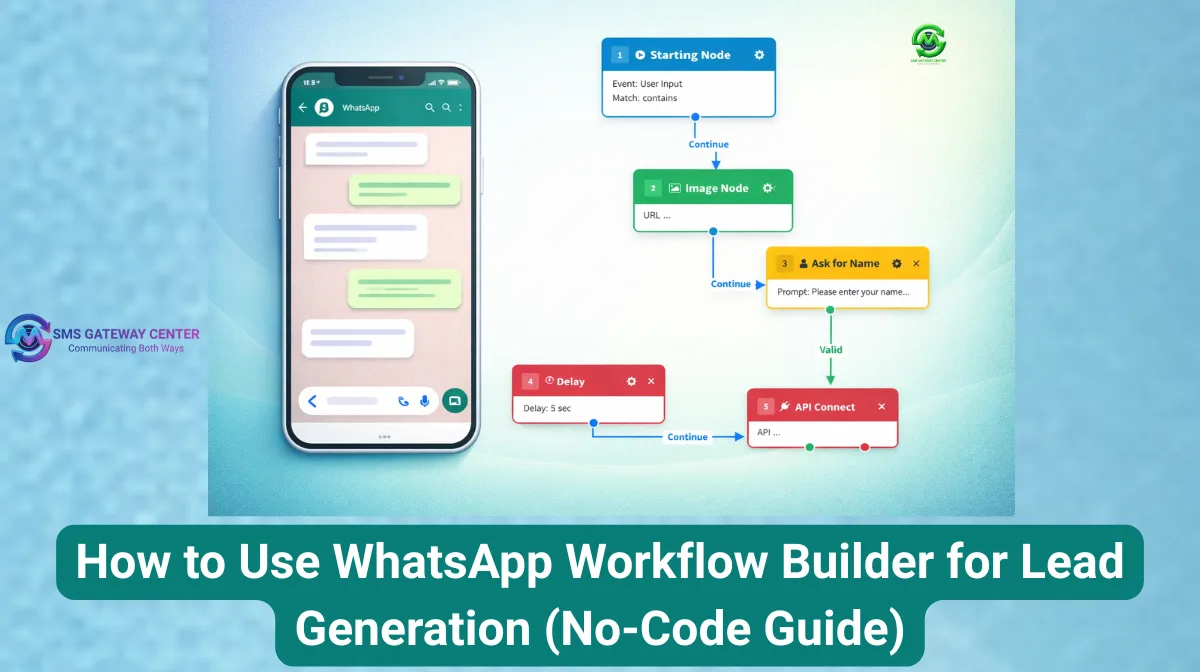
A WhatsApp Workflow Builder is a visual automation tool inside your WhatsApp Business or API setup that lets you create journeys: sequences of messages, questions, delays, and actions that run when a user triggers them (for example by sending a keyword or opening a chat).
Think of it like a flowchart. You add blocks for “Send text,” “Ask for name,” “Wait 2 hours,” “If answer is X, send this; else send that,” and “Hand over to agent.” The builder draws the flow; the system runs it when contacts interact with your WhatsApp number.
Who it’s for: Marketing teams, support leads, SMBs, and anyone using WhatsApp for business who wants automated lead capture, nurture, or qualification without depending on developers.
What Is the Workflow Builder Used For?
The builder is used for any scenario where you want consistent, automated WhatsApp conversations at scale.
- Lead generation – Capture name, email, phone, company, or custom answers and store them (e.g. in your CRM or data profile).
- Lead qualification – Ask a few questions, branch by answer (e.g. “Are you a decision maker?”), and send different next steps or hand over to sales.
- Nurture sequences – Welcome new subscribers, send a series of messages with delays, then a CTA (link or button) to book a call or download a resource.
- Support deflection – Answer FAQs with buttons or lists; only transfer to an agent when the user picks “Talk to agent.”
- Event / webinar signups – Collect details and send confirmation and reminders via WhatsApp templates.
- Surveys and feedback – Ask for ratings or short text and optionally send a thank-you or coupon.
All of this runs on the same idea: trigger → messages → collect input → conditions → actions (delay, API, agent handover). The workflow builder is the tool that lets you design and change these flows visually.
Why Use a Visual Builder Instead of Manual Scripts?
Manual scripts and spreadsheets don’t scale. A visual builder gives you:
- Clarity – See the whole journey on one canvas; no guessing what happens after “Ask for email.”
- Speed – Change copy, add a step, or swap a template in minutes instead of waiting for code deploys.
- Fewer errors – Validation and required fields (e.g. “Workflow Config”) reduce misconfiguration.
- Reuse – Duplicate a workflow, tweak for a new campaign or region, and go live.
- Testing – Use the in-app “Test Journey” in the web widget before going live, so you catch issues early.
For lead gen, that means you can iterate on questions, timing, and handover rules without touching code.
Building Lead Generation Journeys: 3 Practical Examples
Below are three concrete lead-gen flows you can build with a workflow builder that supports message nodes, collect-input nodes, conditions, delays, and agent transfer.
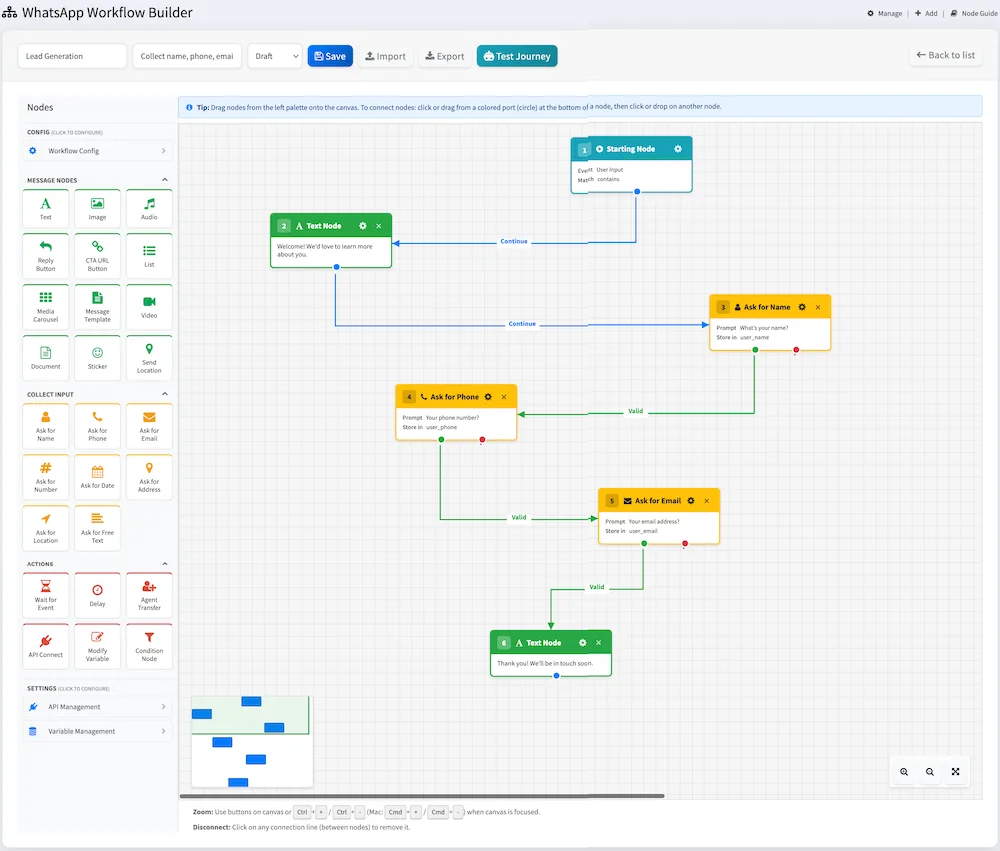
Example 1: Simple “Keyword → Capture Name & Email → Thank You” Journey
Goal: When someone sends “LEAD” (or “Interested”), the bot welcomes them, asks for name, then email, then sends a thank-you and optionally a PDF link or template.
Flow in the builder:
- Trigger (Starting Node + Workflow Config)
In Workflow Config, set keyword LEAD (and optionally reset/cancel/expiry keywords). When the user sends “LEAD,” the journey starts. - Message – Text
“Thanks for your interest! We’ll send you our guide. What’s your name?” - Collect Input – Ask for Name
Single node that asks for name and saves it (e.g. to a variable likelead_name). - Message – Text
“Hi {{lead_name}}! What’s your email address?” - Collect Input – Ask for Email
Saves to e.g.lead_email. Add basic validation if the node supports it. - Message – Text or Template
“Thank you! We’ve received your details. Check your email for the guide.” You can use a Message Template or CTA URL button here to send a link. - Optional: API Connect
Call your CRM or SMS/email gateway to create the lead and send the asset.
Result: Every “LEAD” reply becomes a structured lead (name + email) with no manual copy-paste.
Example 2: Qualified Lead Funnel with Conditions and Agent Handover
Goal: Qualify leads by asking “Are you the decision maker?” and “Company size?” Then either send a resource (low intent) or hand over to a live agent (high intent).
Flow:
- Trigger
Keyword e.g. “DEMO” or “TALK”. - Welcome + Ask for Name
Text: “Hi! To get you the right info, what’s your name?” → Ask for Name → save aslead_name. - Ask Decision Maker (Yes/No)
Ask for Free Text or use Reply Button (e.g. “Yes” / “No”): “Are you the decision maker for your company’s purchases?” Save asis_decision_maker. - Condition Node
- If
is_decision_maker= “Yes” → go to step “Ask company size.” - Else → send “No problem! Here’s a link to our resources…” and end (or add to a nurture workflow later).
- If
- Ask Company Size
List or Reply Buttons: “Small (1–50) / Mid (51–200) / Enterprise (200+).” Save ascompany_size. - Condition Node
- If
company_size= “Enterprise” or “Mid” → go to Agent Transfer (select the right agent in the node). - Else → send “Thanks! A team member will reach out within 24 hours” and optionally still use Agent Transfer or API Connect to create a lead in your CRM.
- If
- Agent Transfer
Use the Agent Transfer node to hand the chat to a live agent. The agent sees the conversation and the collected variables (name, decision maker, company size).
Result: Only high-intent, qualified leads get immediate human follow-up; others get automated follow-up or content.
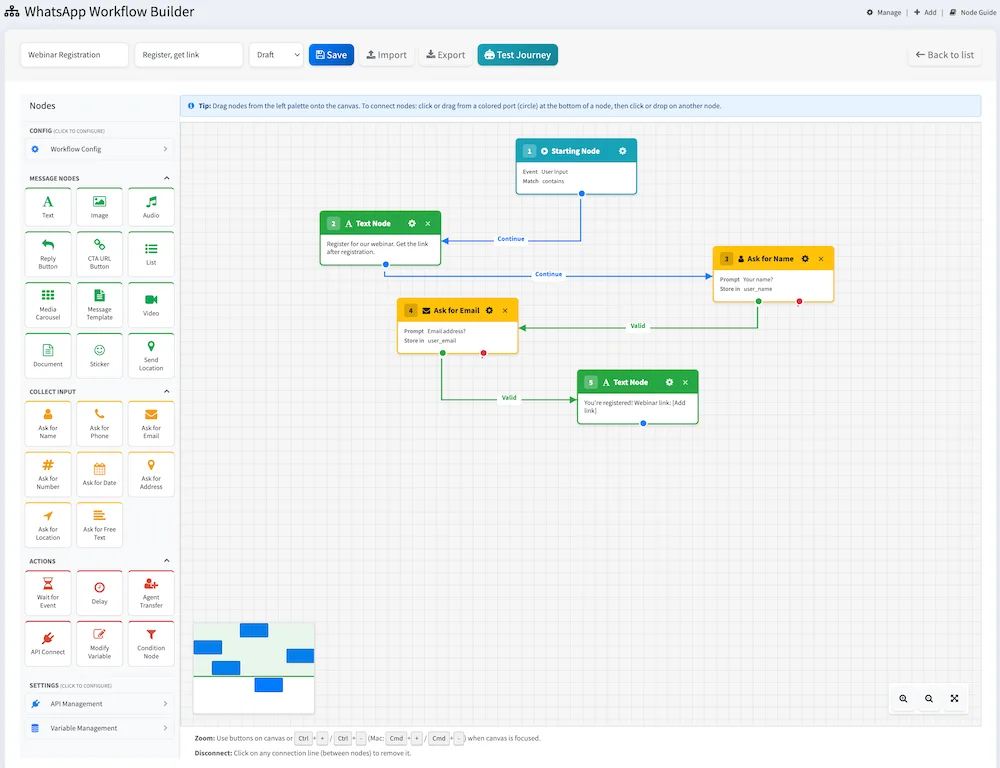
Example 3: Webinar / Event Signup with Reminder
Goal: Capture name, email, and phone for a webinar; send confirmation and a reminder 1 day before.
Flow:
- Trigger
Keyword “WEBINAR” (or from a bulk WhatsApp campaign CTA). - Message – Text
“You’re one step away from securing your spot! What’s your full name?” - Ask for Name →
attendee_name - Ask for Email →
attendee_email - Ask for Phone →
attendee_phone(useful for reminder or backup comms). - Message – Template
Use a pre-approved Message Template with variables for name, date, and link: “Hi {{1}}, you’re registered for our webinar on {{2}}. Join here: {{3}}.” - Delay
Delay node: 24 hours (or whatever your builder supports). - Message – Text or Template
“Reminder: Our webinar is tomorrow! Here’s your link again: [link]. See you there, {{attendee_name}}!” - API Connect (optional)
After step 6, call your event tool or CRM to register the lead and sync with email reminders.
Result: Full registration data (name, email, phone) plus automated confirmation and reminder—all from one workflow.
Tips for Effective Lead-Gen Workflows
- Keep the first message short – One clear ask (e.g. name only) increases completion.
- Use buttons and lists where possible – They’re easier than typing and reduce errors (e.g. “Yes/No,” “Small/Mid/Enterprise”).
- Set Workflow Config once – Define trigger keyword, reset/cancel/expiry and “message for expiry” so users aren’t stuck in old flows.
- Test before going live – Use the builder’s “Test Journey” in the web widget to run through every branch.
- Respect 24-hour rule – After 24 hours of inactivity, use approved templates for the next message; the builder’s template node is built for this.
- Hand over at the right moment – Use Agent Transfer when the lead is qualified or asks to talk to someone; avoid transferring too early or too late.
Where the Workflow Builder Sits in Your Stack
The Workflow Builder typically lives inside your WhatsApp feature (e.g. under WhatsApp → Workflow Builder → Add Workflow). It uses the same WhatsApp Business API / number you use for bulk messaging and two-way chat. Leads you collect can be:
- Stored in Variable Management and viewed in User State or Data Profile.
- Sent to your CRM or marketing tool via API Connect.
- Handed to your team via Agent Transfer.
So the builder doesn’t replace your API or gateway—it makes it easier to design and run automated, lead-gen conversations on top of them.
Wrapping Up
A WhatsApp Workflow Builder is used to design and run automated WhatsApp journeys—especially lead generation—without code. You use it to capture names, emails, and phones, qualify leads with conditions, send confirmations and reminders, and hand over to agents when it matters. Start with a simple keyword → name → email → thank-you flow, then add conditions and agent handover for qualified leads, or add delays and templates for event signups and reminders. Build once, test in the widget, then go live and refine based on real conversations.